| Easy Heading Macro | ||||
|---|---|---|---|---|
|
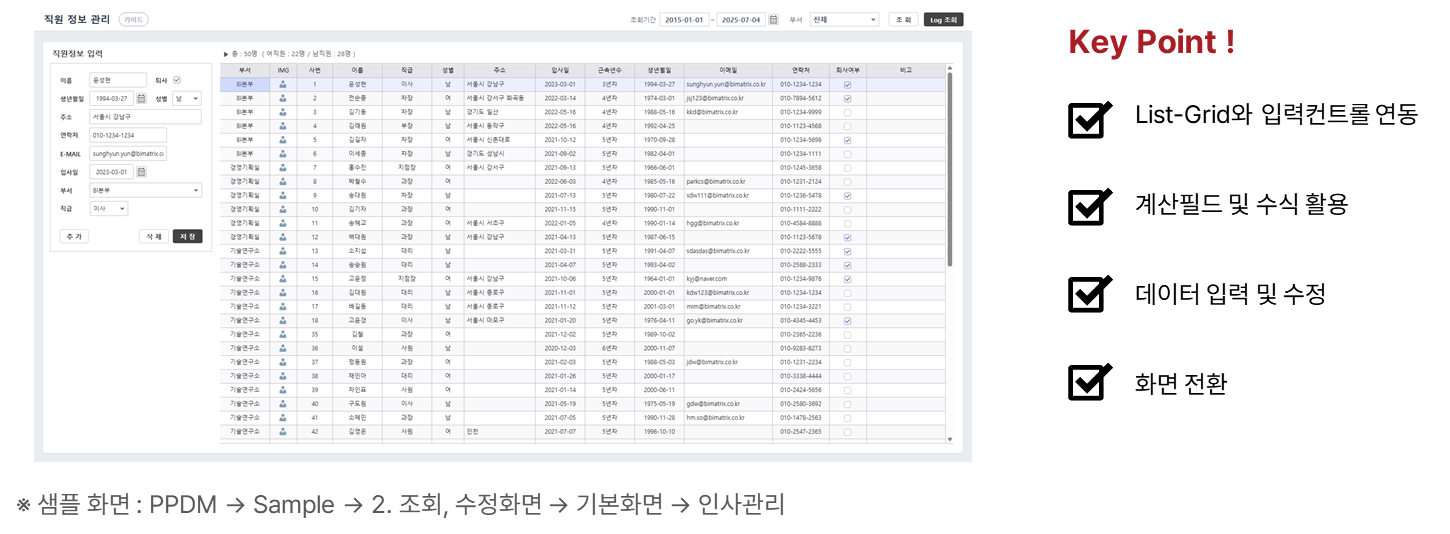
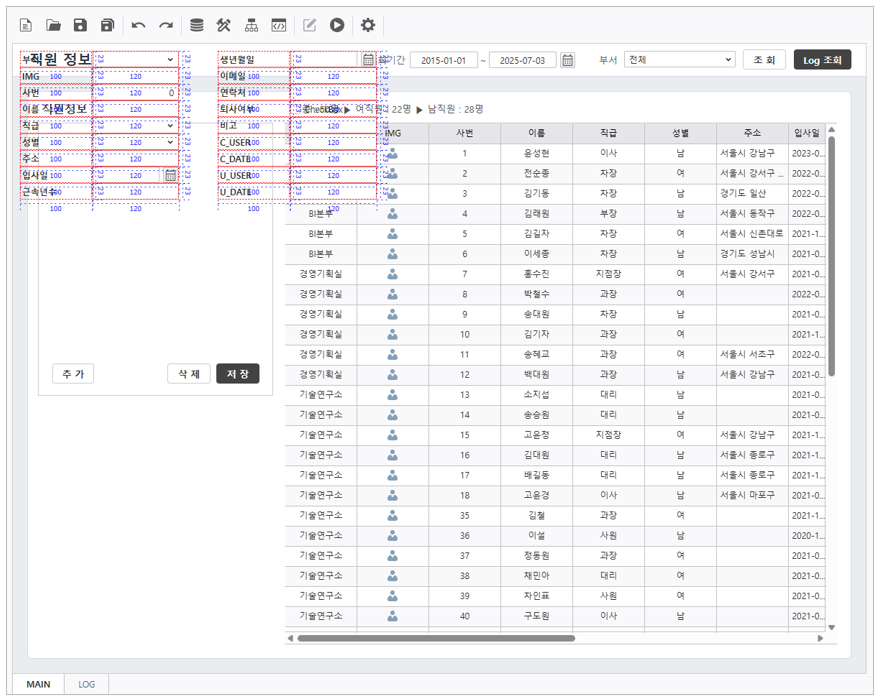
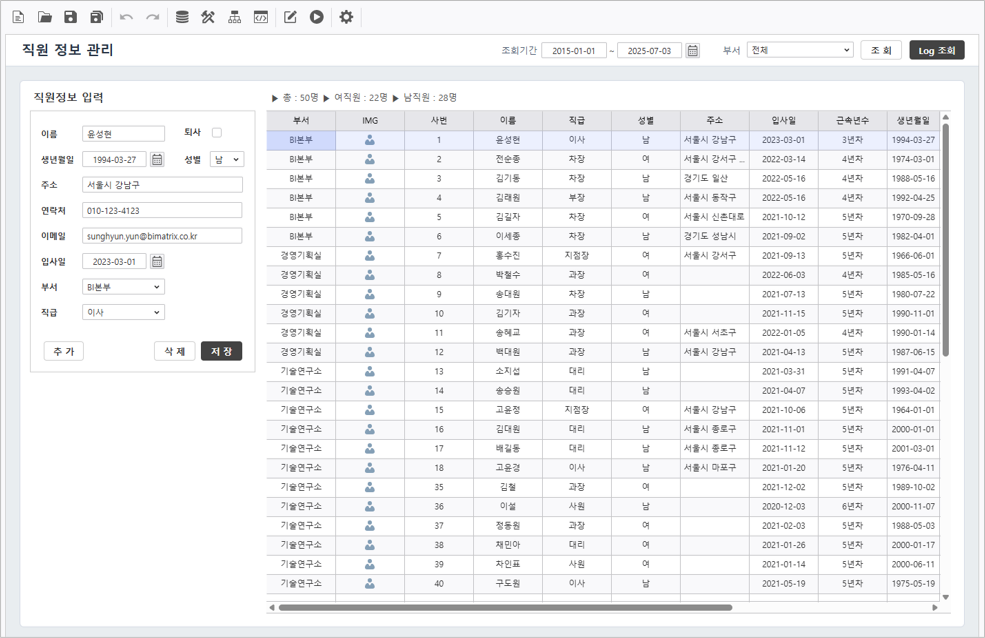
목표화면Target Screen | ||||||||
|---|---|---|---|---|---|---|---|---|
| ||||||||
| ||||||||
|

Step 1.
데이터 연결하기Establish Data Connections
1.1 조회 조건 컨트롤 생성데이터 조회를 위한 컨트롤을 생성합니다Create Inquiry Controls
Generate the necessary components for data filtering.
1. 조회기간 Date Range (입사일Join Date)
- 조회기간 컨트롤의 제목 라벨 컨트롤을 Navigate to UI Bot > Label을 선택하여 생성합니다.
컨트롤의 속성을 변경합니다 to create the title. - Set the control's property to "Period".
- Text : 조회기간
- Period
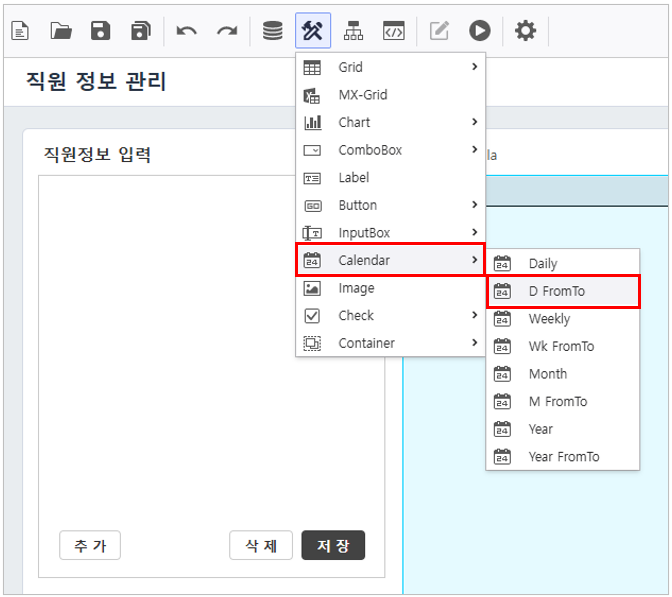
- Navigate to UI Bot > Calendar > D From To를 선택하여 생성합니다 to create the date range picker.
컨트롤의 속성을 변경합니다
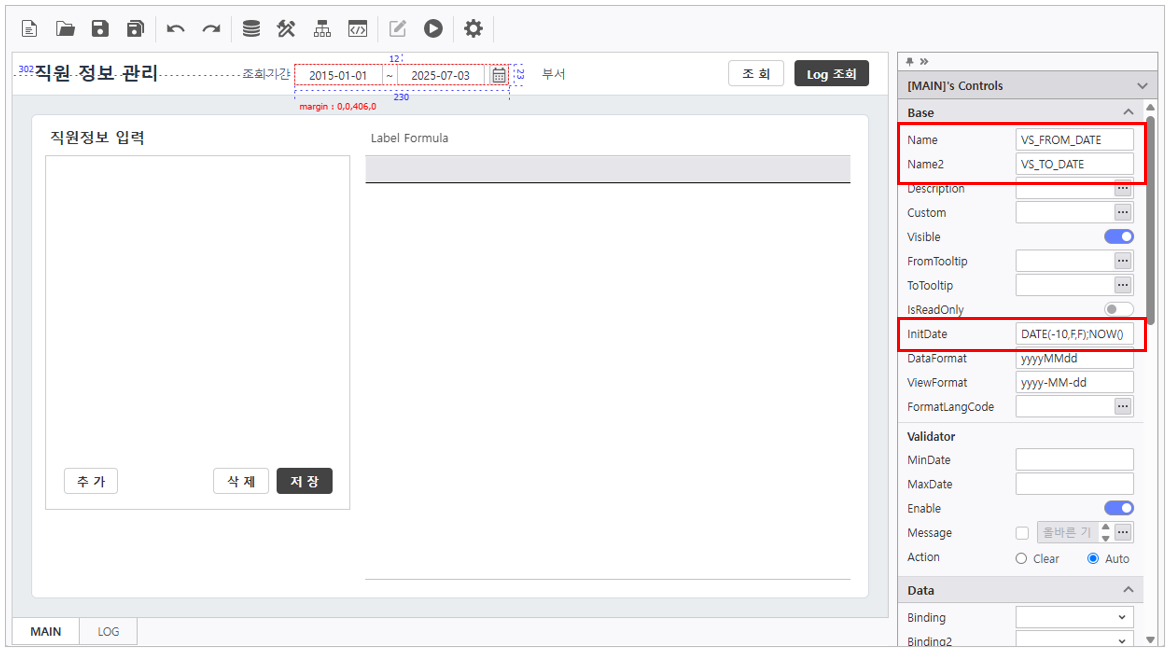
- Set the control's properties.
- Name : VS_FROM_DATE
- Name2 : VS_TO_DATE
- InitDate : DATE(-10,F,F);NOW()

2. 부서
부서 컨트롤의 제목 라벨 컨트롤을Division
- Create via UI Bot > Label을 선택하여 생성합니다.
컨트롤의 속성을 변경합니다 to create Division control's title. - Set the control's property.
- Text : 부서
- Division
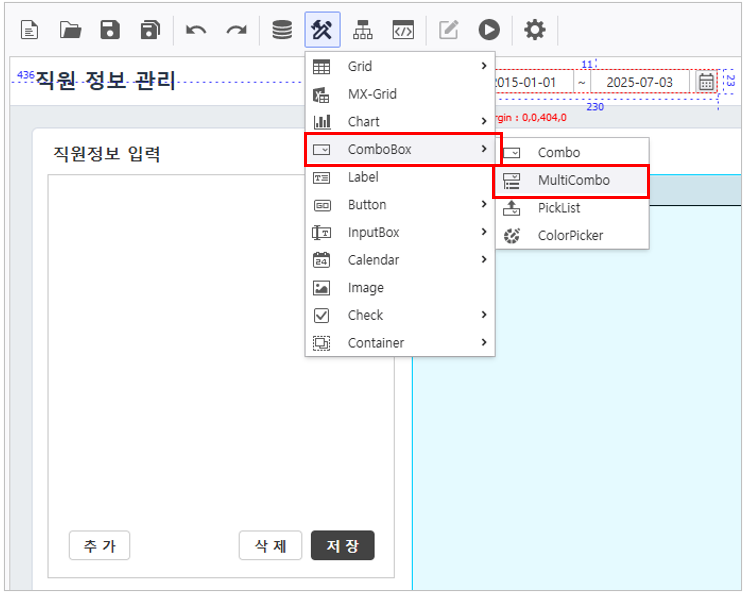
- Navigate to UI Bot > ComboBox > MultiCombo를 선택하여 생성합니다 to use a combo box as a filter condition.
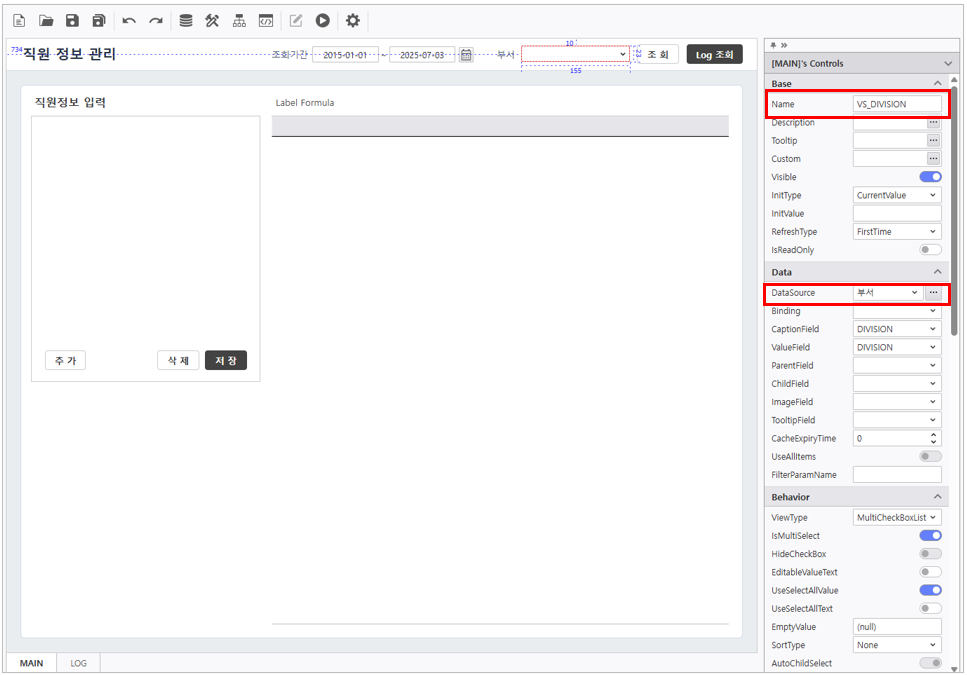
컨트롤의 속성을 변경합니다
- Set the control's properties.
- Name : VS_DIVISION
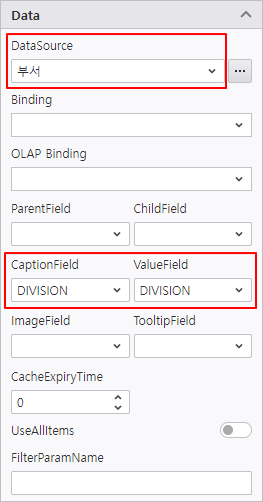
- DataSource : 부서Division
- CaptionField : DIVISION
- ValueField : DIVISION
- Enable UseSelectText 활성화
- Enable AutoRefresh 활성화


1.2 Bind List-Grid
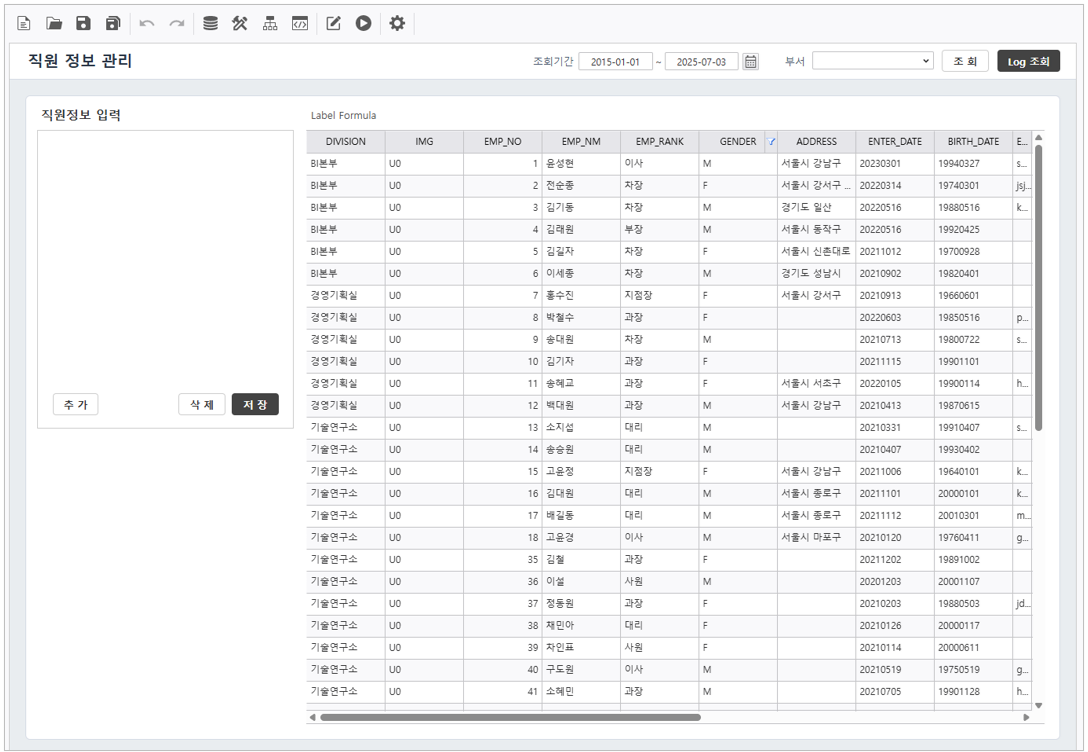
데이터소스 연결그리드 컨트롤에 "그리드" 데이터소스 연결 후 보고서를 조회하여 정상적으로 실행되는지 확인합니다.
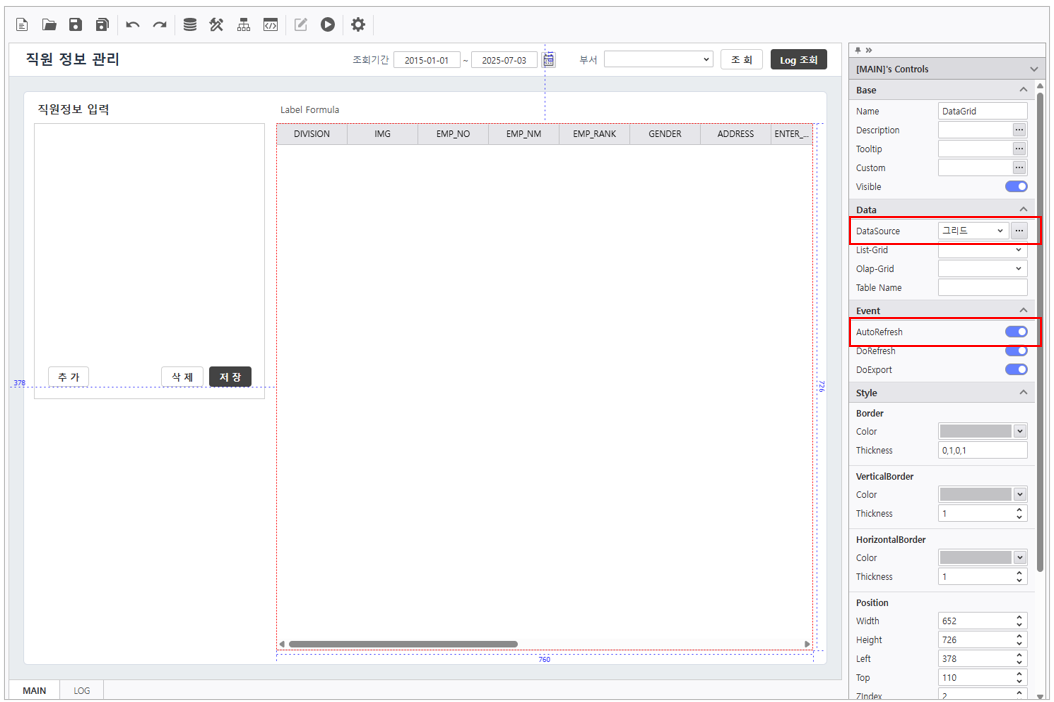
Data Source
Connect the "Grid" data source to the grid control and execute the report to verify the data stream.

| 참고사항 | |||||||||||
|---|---|---|---|---|---|---|---|---|---|---|---|
| |||||||||||
|

Step 2. Configure List-Grid
속성 설정하기Properties
| 참고사항 | |||||||||||||||||||||||||||||||||||||||||||||||||||||||||||||||||||||||||||||||||||||||||||||||
|---|---|---|---|---|---|---|---|---|---|---|---|---|---|---|---|---|---|---|---|---|---|---|---|---|---|---|---|---|---|---|---|---|---|---|---|---|---|---|---|---|---|---|---|---|---|---|---|---|---|---|---|---|---|---|---|---|---|---|---|---|---|---|---|---|---|---|---|---|---|---|---|---|---|---|---|---|---|---|---|---|---|---|---|---|---|---|---|---|---|---|---|---|---|---|---|
| 필드명 | 화면표시명 | 필드유형 | 데이터 | 정렬 > 텍스트 정렬
| ||||||||||||||||||||||||||||||||||||||||||||||||||||||||||||||||||||||||||||||||||||||||||
Define the List-Grid's field types for optimized data entry.
|


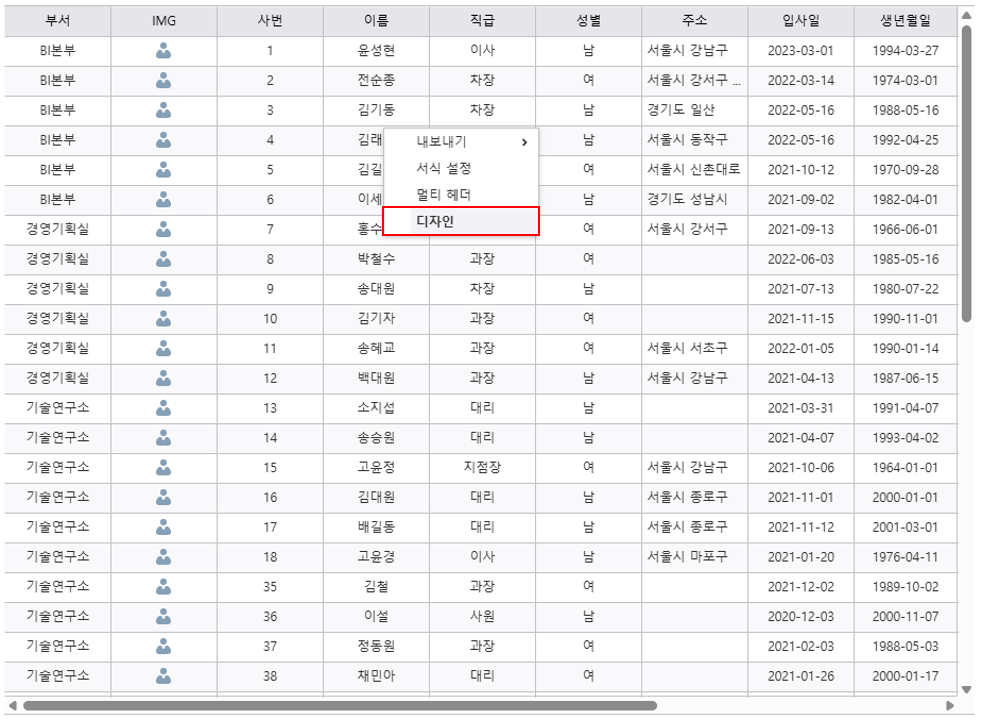
Right-click the List Grid 컨트롤의 디자인을 수정하기 위해 컨트롤을 우 클릭 후 [디자인]을 선택해 디자인 창을 실행합니다.
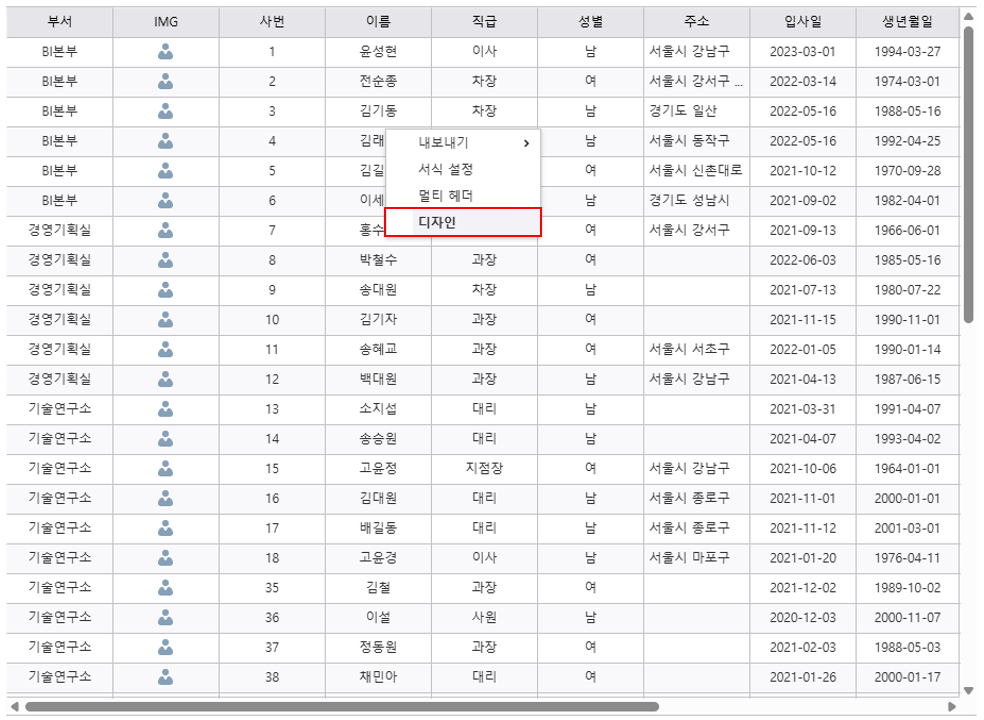
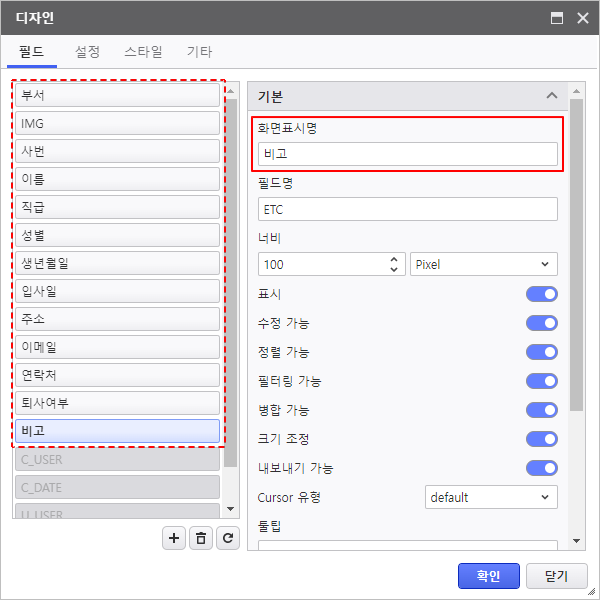
보고서 화면에서 사용하지 않는 필드는 전체 선택하여 표시를 비활성화합니다
-Grid and select [Design] to launch the configuration window.

- Update the Caption for each field.

- Select and deactivate Show property to hide unused fields.
- C_USER, C_DATE, U_USER, U_DATE - 표시 비활성화
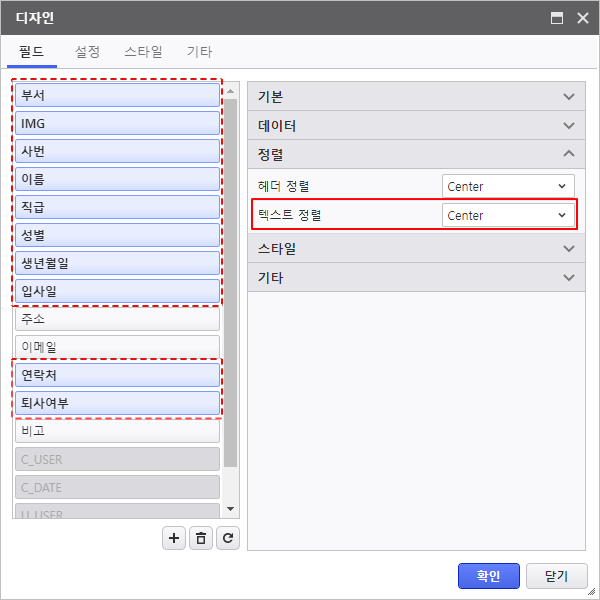
필드의 텍스트 정렬을 변경합니다.
- 정렬 - 텍스트 정렬Deactivate "Show"

Set Data Align for all relevant fields.
- Alignment - Data Alignment : Center
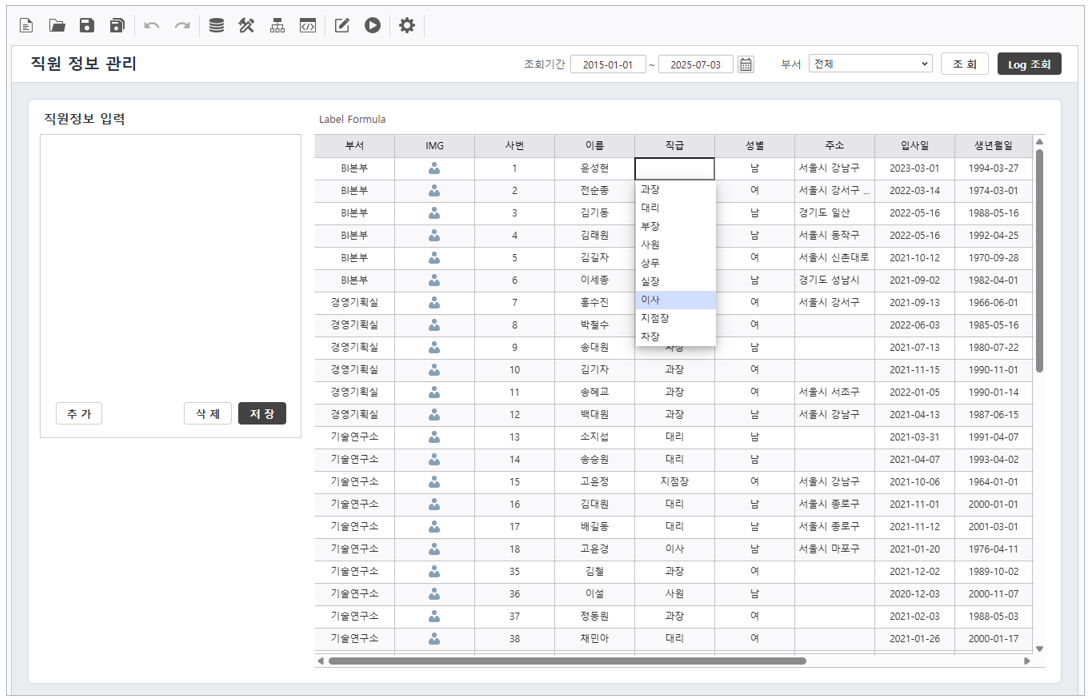
필드 유형을 변경하여 값을 쉽게 변경할 수 있도록 설정합니다.
필드 명 필드 유형 
Configure field types to enable intuitive data entry.
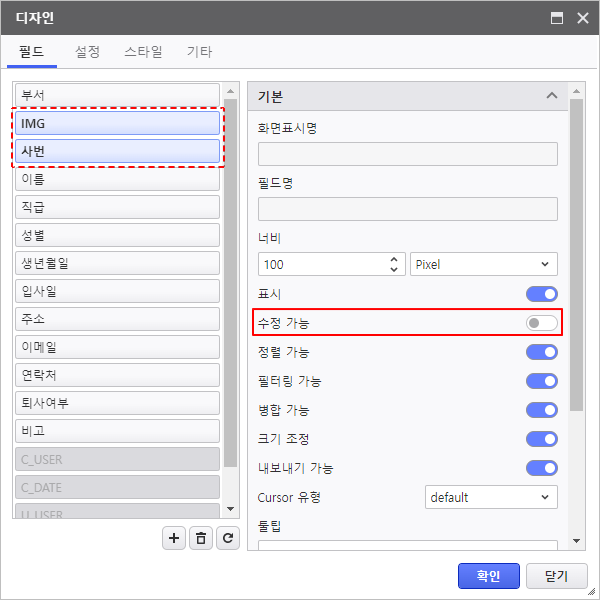
IMG, 사번 필드의 수정 가능 기능을 비활성화합니다.Field Names Field Type Division / Rank / Gender 펼치기 title ComboBox 필드 유형, 데이터소스 설정
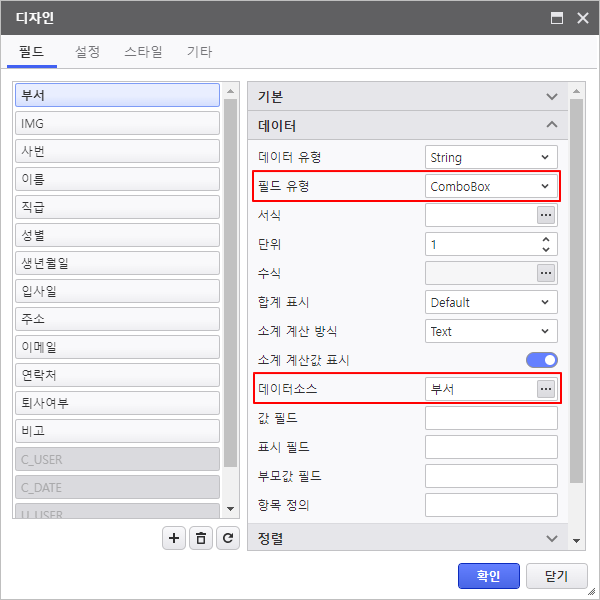 Field Type & Data Source Configuration
IMG 펼치기 title Image 필드 유형 설정
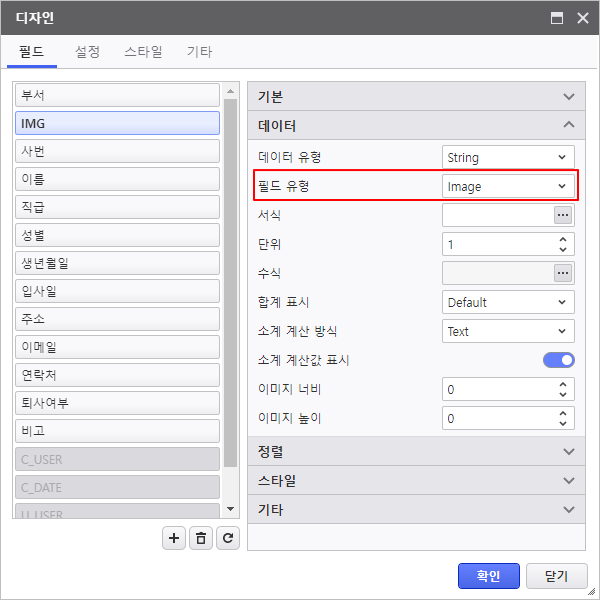
Field Type Configuration

DOB / Join Date 펼치기 title DateTime 필드 유형, 서식 설정
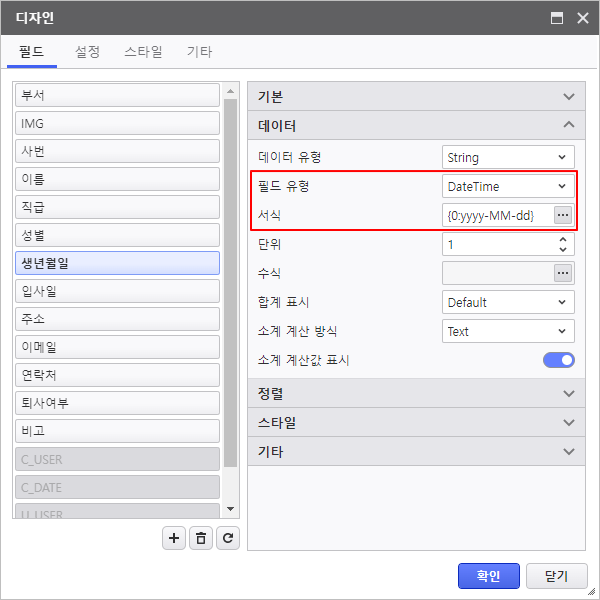
Field Type & Format Configuration

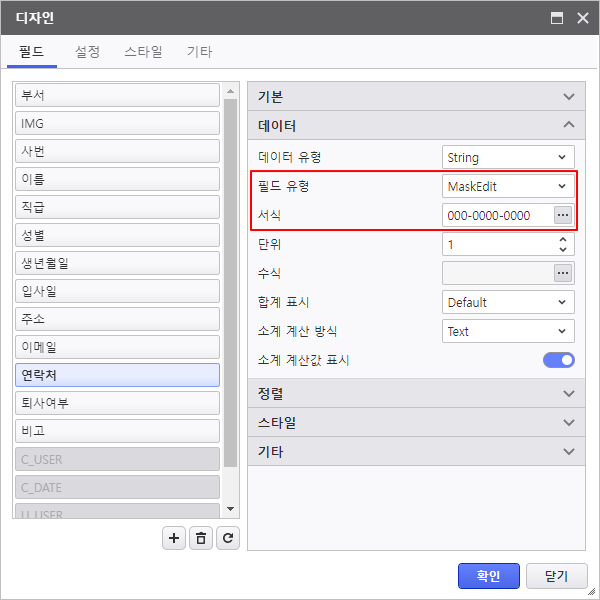
Contact 펼치기 title MaskEdit 필드 유형, 서식 설정
(서식은 서식창에 입력합니다Field Type & Format Configuration
(Enter formats in the Format window.)

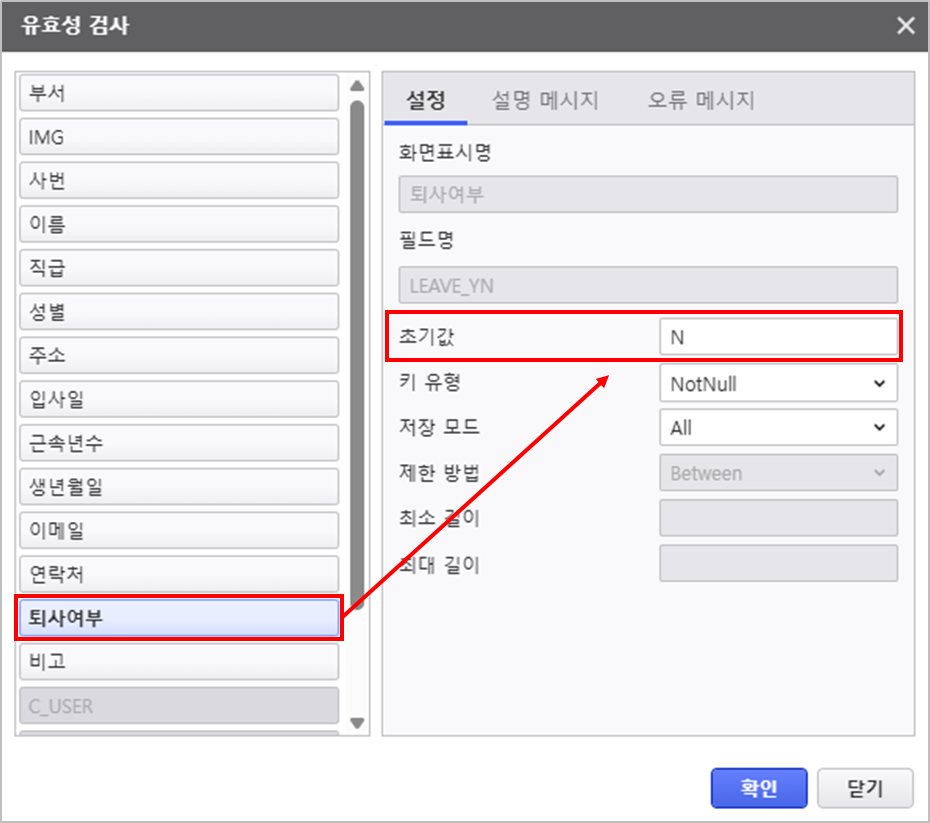
퇴사여부Resigned 펼치기 title CheckBox 필드 유형Field Type, CheckedValue, and UnCheckedValue 설정Configuration

- 마지막으로 우 클릭 > 유효성 검사 메뉴를 통해 [퇴사여부] 데이터 수정 시 자동으로 입력될 초기 값을 설정합니다.
보고서를 실행하여 설정한 디자인 항목이 정상적으로 적용되었는지 확인합니다.
Step 3. 수식 편집기 활용하기
수식 편집기를 활용하여 근속년수, 직원수를 계산합니다.
3.1 계산필드 추가
- List Grid에 계산필드를 추가하기 위해 [디자인]을 클릭하여 디자인 설정창을 실행합니다.
 버튼을 눌러 필드를 추가합니다.
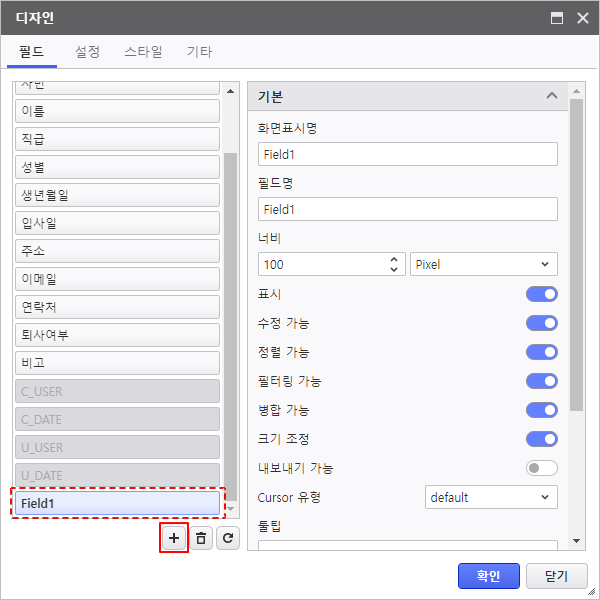
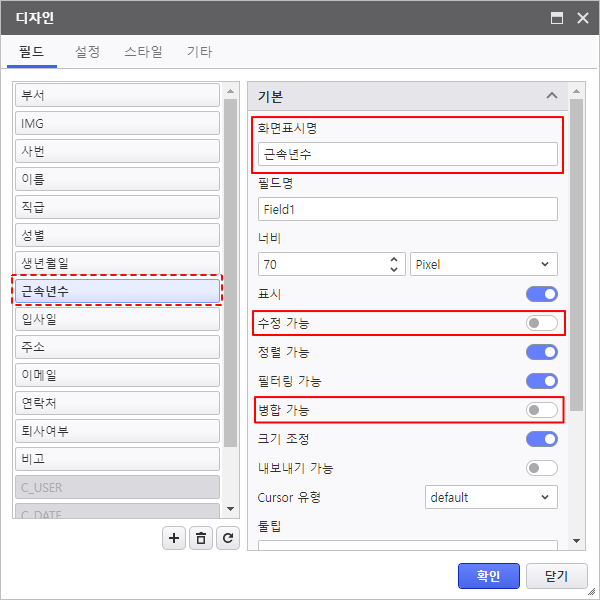
필드를 생년월일 필드와 입사일 필드 사이로 이동하고, 기본 속성을 변경합니다.- 화면표시명 : 근속년수
- 수정 가능 비활성화
- 병합 가능 비활성화
데이터 - 수식의 버튼을 클릭하여 수식 편집기 창을 실행합니다.
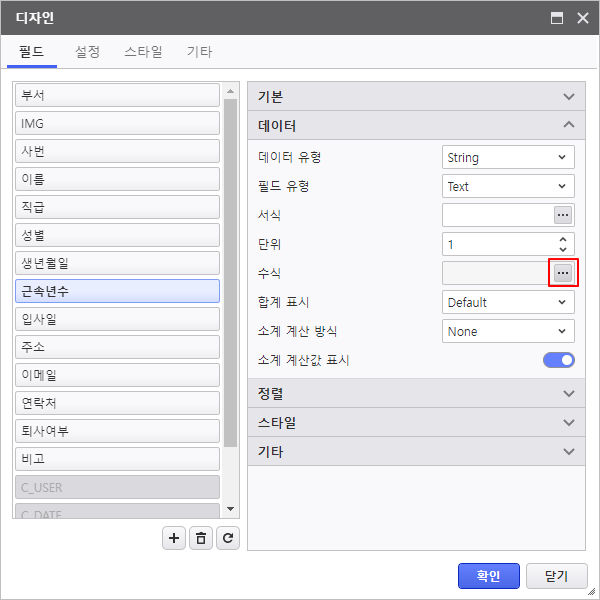
좌측 목록에서 YEAR 함수와 [입사일] 필드를 선택하여 수식을 작성한 후 적용 버튼을 눌러 수식 작성을 완료합니다.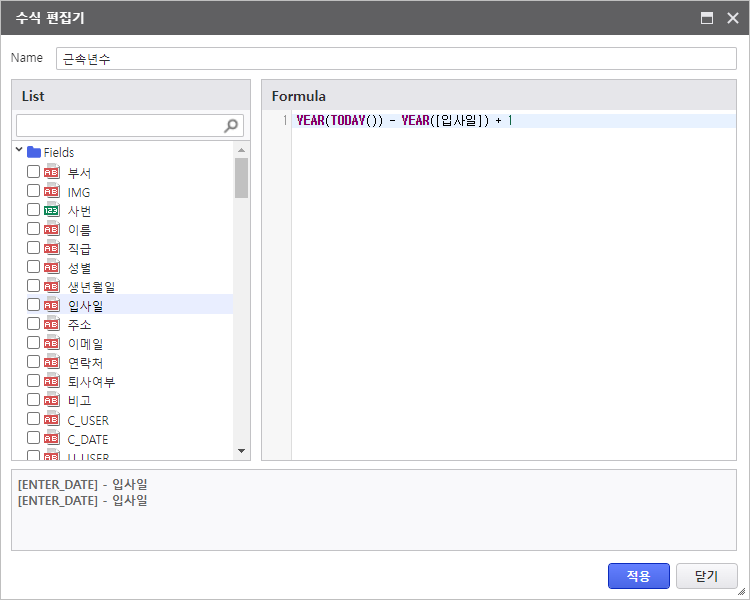

- Deactivate the "Editable" property for IMG and EMP_NO(ID).

- Access right-click the List-Grid > Validation menu to set the default initial value for the [LEAVE_YN](Resigned) field when records are modified.

Run the report to verify that the design configurations have been successfully applied.

Step 3. Utilizing the Formula Editor
Calculate employee metrics such as "Years of Service" and "Headcount" using Formula Editor.
3.1 Add Calculated Fields
- To add a new calculated field, click [Design] menu and open the Design window.

- Add button to insert a new field.

- Move the field between DOB and Join Date fields and set the default settings.
- Caption : Years of Service
- Deactivate Editable
- Deactivate Mergeable

- Navigate to Data > Formula and click button to open Formula Editor window.

Use YEAR function and [Join Date] field on the left to calculate "Years of Service" and click Apply button to finish writing.

패널 펼치기 title 사용한 수식 펼치기Expand Formula Used YEAR(TODAY()) - YEAR([입사일Join Date]) + 1
- 서식의 버튼을 클릭하여 서식 편집기 창을 실행한 후 숫자 형식에 Click the Format button and enter "{0:N0] 년차"를 입력합니다Years" in the Numeric format field.
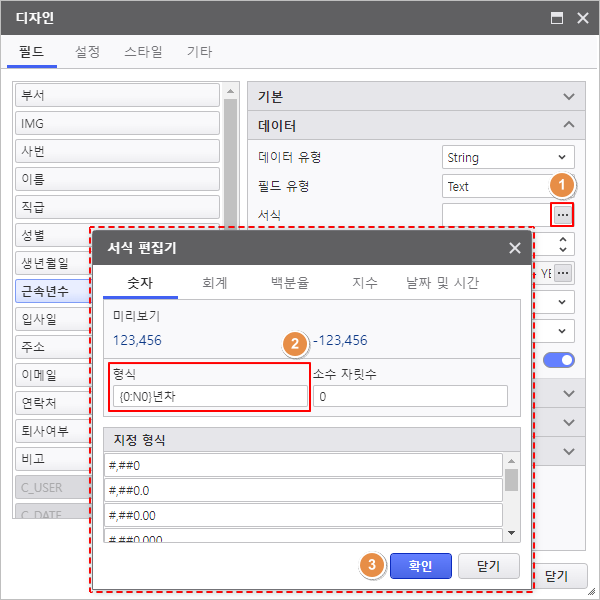
텍스트 정렬을 설정합니다
- Set its data alignment.
- 정렬 Alignment - 텍스트 정렬Data Alignment : Center
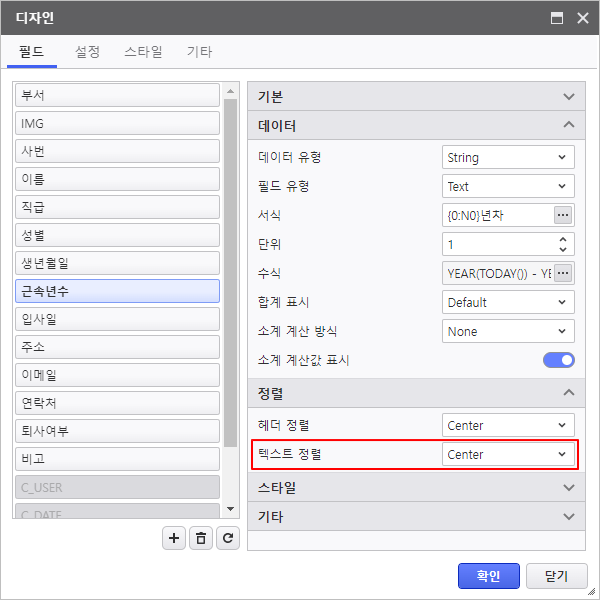
보고서를 실행하여 근속년수 필드가 정상적으로 추가 되었는지 확인합니다.
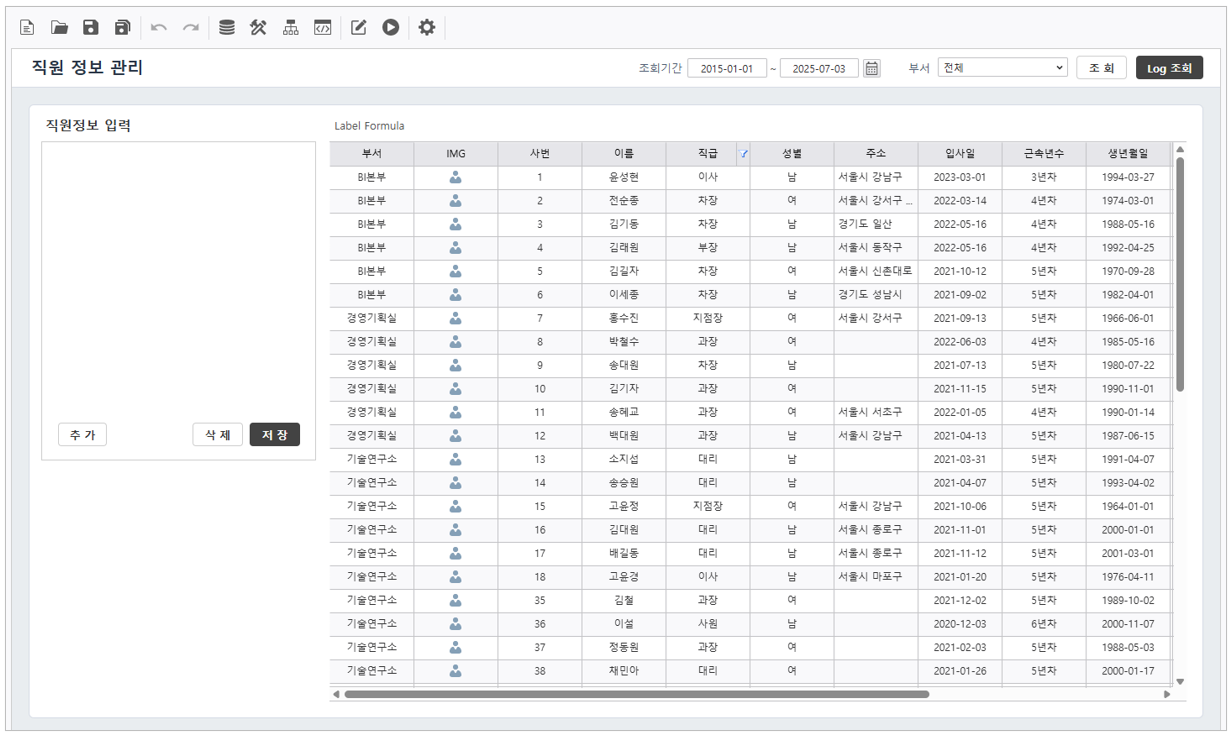

Run the report to confirm the "Years of Service" field has been successfully added.

3.2 Apply Label Formula
활용Label의 Formula를 활용하여 직원 수의 집계값을 표현합니다.
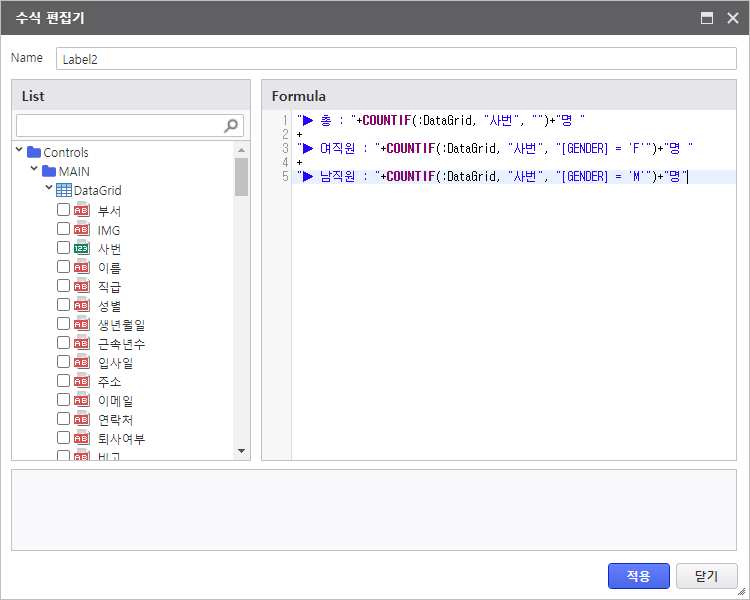
List Grid의 상단에 있는 [Label2] 컨트롤을 선택하여 Formula의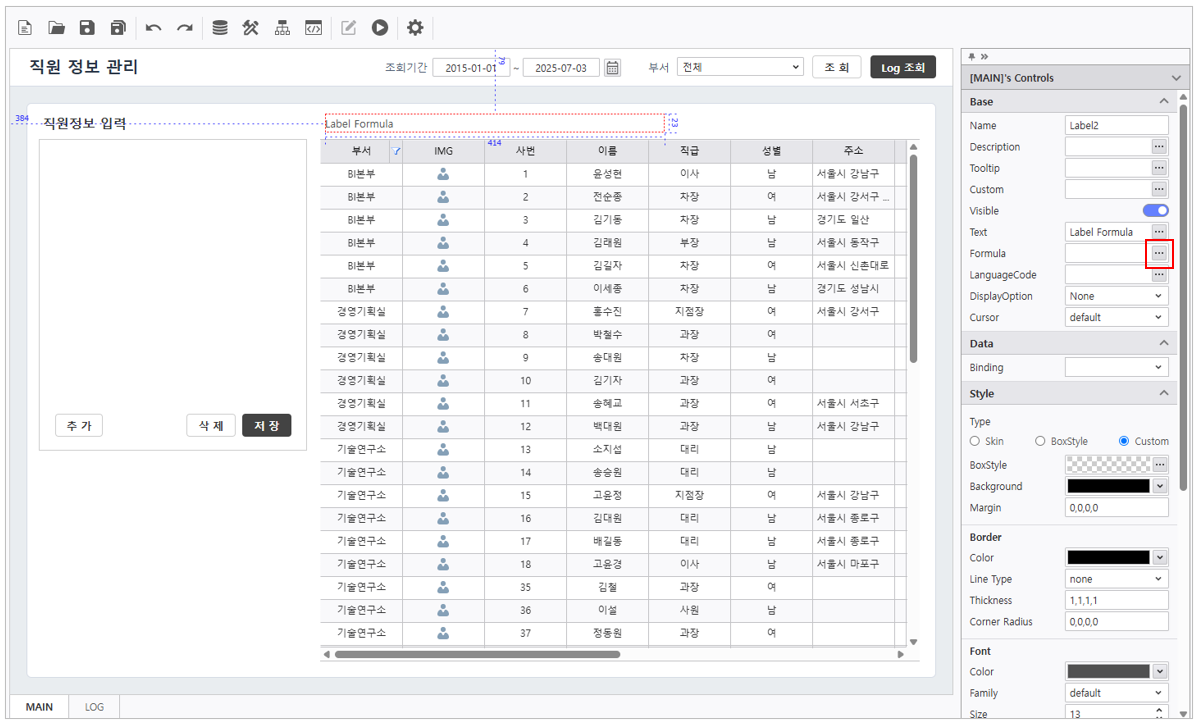
Use Formula property of a Label to display aggregated employee statistics.
Select [Label2] at the top of the List-Grid and click the Formula
button to open the Formula Editor window.
참고사항 icon false title DiscriptionDescription ") 디자이너 내에서 컨트롤 찾는 방법
디자이너 내에서 컨트롤 찾는 방법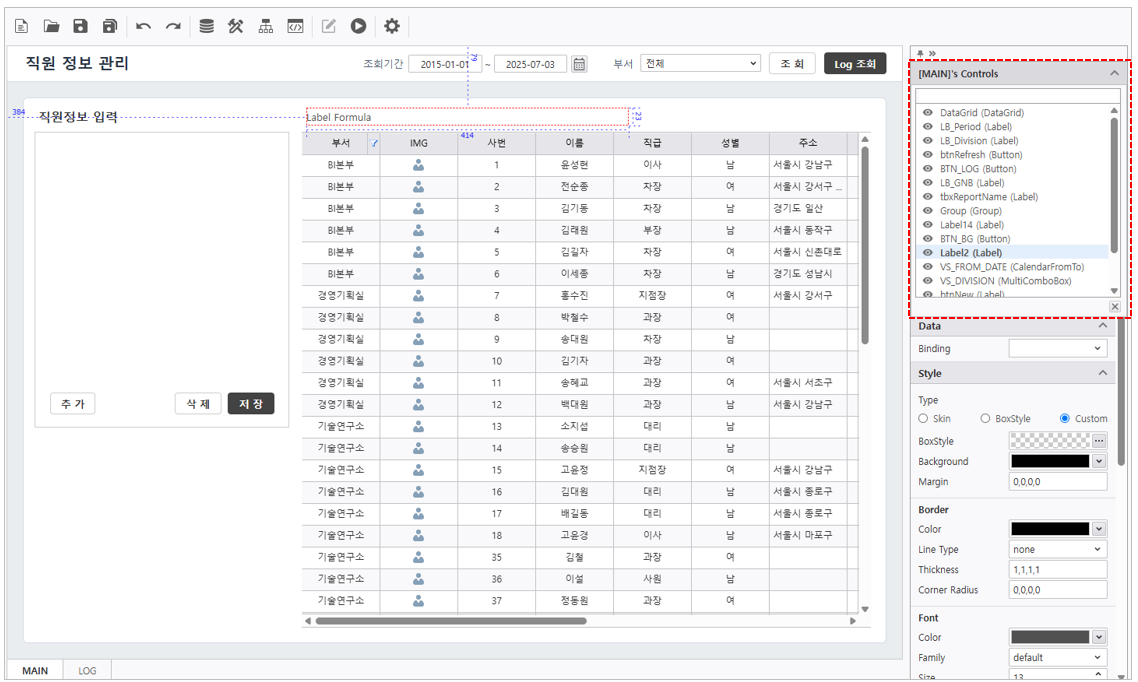
우측 상단의 "[폼 이름 How to Locate Controls

Click the "[Form Name]'s Controls" 를 클릭합니다.
팝업창에서 컨트롤 목록을 확인할 수 있으며, Visible 상태 수정 및 선택한 컨트롤로 포커스가 맞춰져 컨트롤의 속성을 변경할 수 있습니다.
텍스트와 COUNTIF 함수를 + 연산자로 연결하여 총 직원 수, 여직원 수, 남직원 수를 라벨 컨트롤에 텍스트로 표현합니다.
in the top right of the Designer.
View the list of controls in the popup to modify visibility states or focus on specific components to edit their properties.
Combine static text and COUNTIF function using the + operator to display total, female, and male headcounts.

패널 펼치기 title 사용한 수식 펼치기Expand Formula Used "▶ 총 Total : " + COUNTIF(:DataGrid, "사번EMP_NO", "") + "명"
+
" ( 여직원 ▶ Woman : " + COUNTIF(:DataGrid, "사번EMP_NO", "[GENDER]='Ffemale'") + "명"
+
" / 남직원 ▶ Man : " + COUNTIF(:DataGrid, "사번EMP_NO", "[GENDER]='Mmale'") + "명 )"- Click the [적용] 버튼을 클릭하여 작성한 수식대로 직원수가 정상적으로 계산되는지 확인합니다.
 Apply] button to verify that the employee headcount is calculated correctly according to the formula.
Step 4. CRUD
설정하기입력 폼 생성과 DB Upload 기능을 활용하여 데이터 생성, 조회, 업데이트, 삭제 동작을 설정합니다Configuration
Enable data creation, inquiry, updates, and deletions using Create Input Form and DB Upload features.
4.1
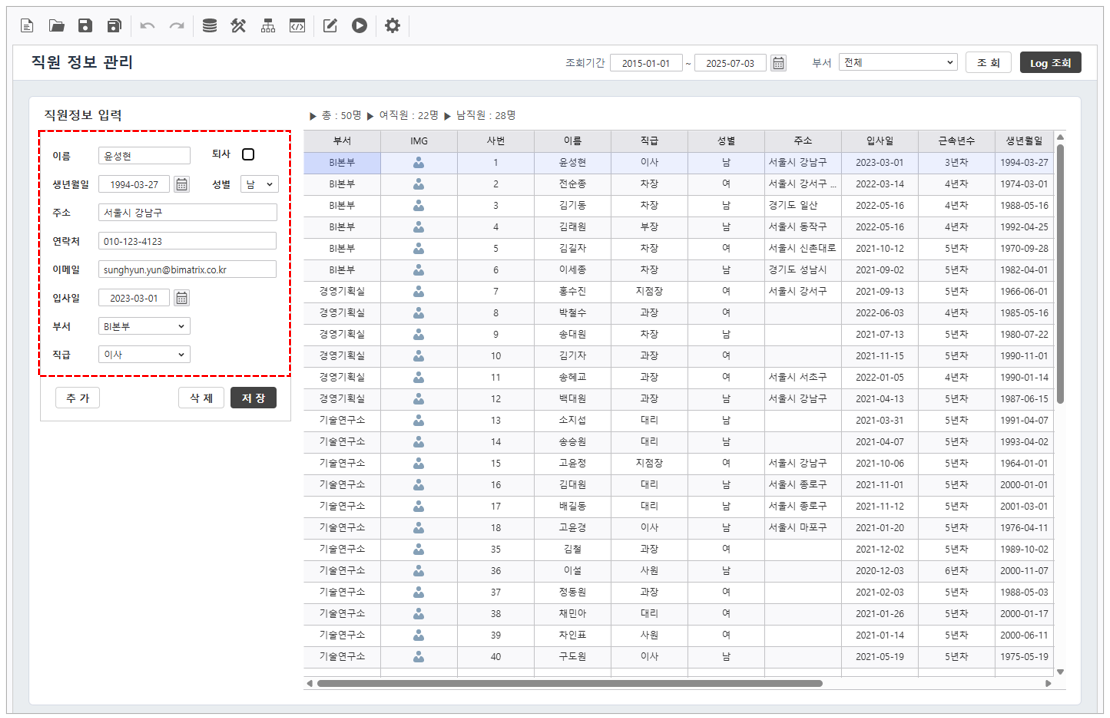
입력 폼 생성입력 폼 생성을 활용하여 입력 컨트롤과 List-Grid를 연결합니다.
[편집 모드]에서 List Grid 컨트롤을 우 클릭하여 [입력 폼 생성] 항목을 선택합니다.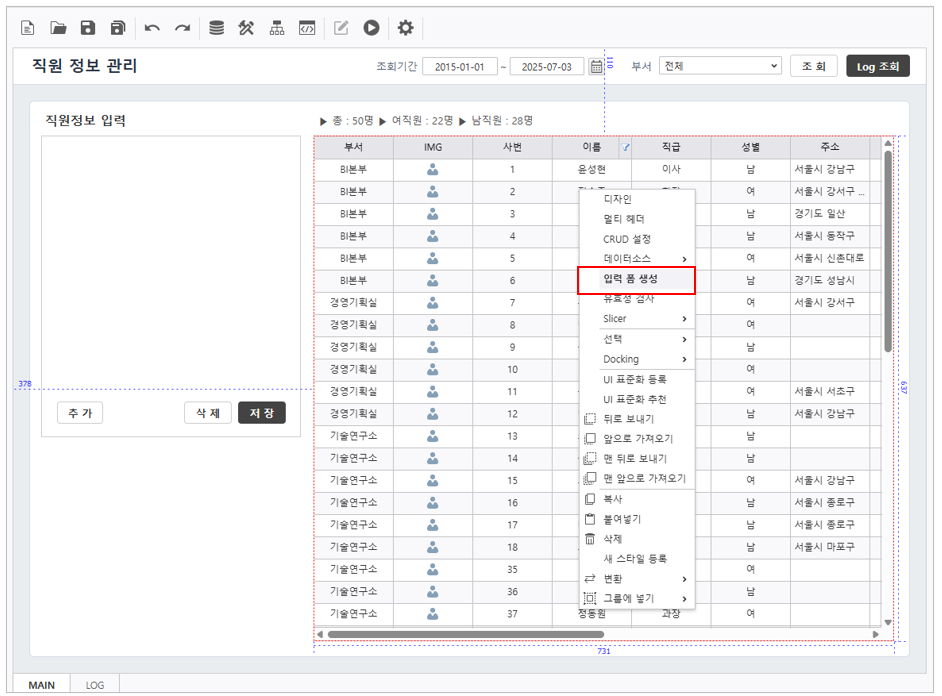
List Grid에 있는 필드 유형대로 라벨과 입력 컨트롤이 생성됩니다.
목표화면과 같이 컨트롤들을 배치합니다.
Create Input Form
Link input controls to the List-Grid using the "CreateInputForm" feature.
- In [Edit Mode], right-click the List-Grid and select [CreateInputForm] menu.

- Labels and input controls will be auto-generated based on the grid's field types.

Rearrange and style these controls to match the target layout.

참고사항 icon false title Discription 입력 폼 생성으로 생성된 컨트롤들은 위치나 크기를 변경할 수 있으며사용하지 않는 컨트롤들은 삭제할 수 있습니다.
또한 컨트롤의 텍스트나 디자인을 변경할 수 있습니다Description Controls generated via "CreateInputForm" can be resized or repositioned,and unused components can be deleted.
Additionally the text and design properties of these controls can be fully customized.
4.2
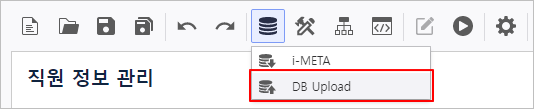
실행 계획 디자인Execution Plan Design
Open the DB Bot - DB Upload
를 선택하여 실행 계획 디자인 창을 실행합니다menu to configure the execution plan.

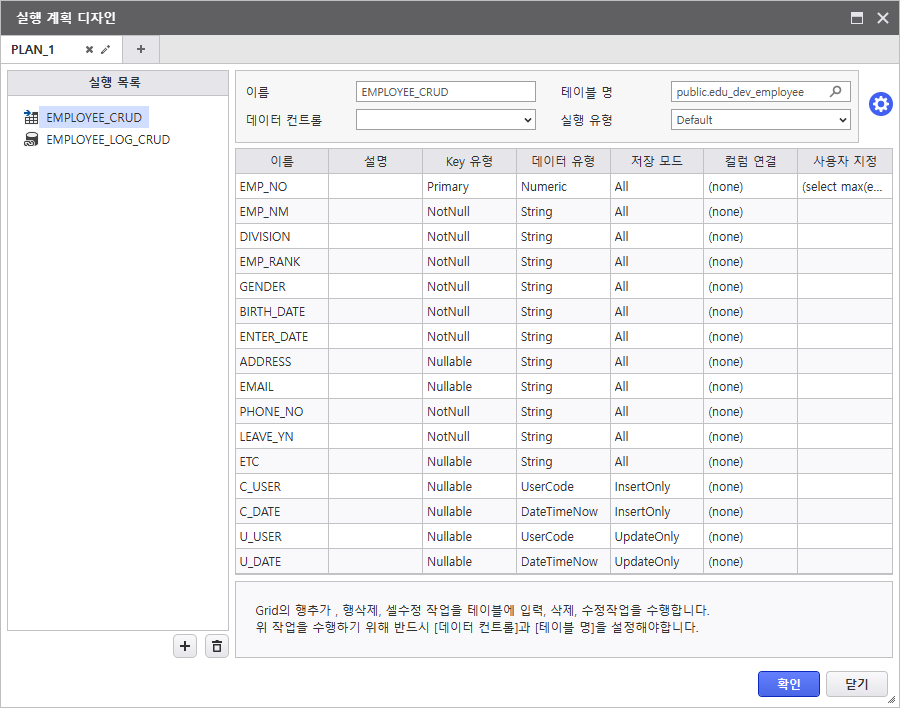

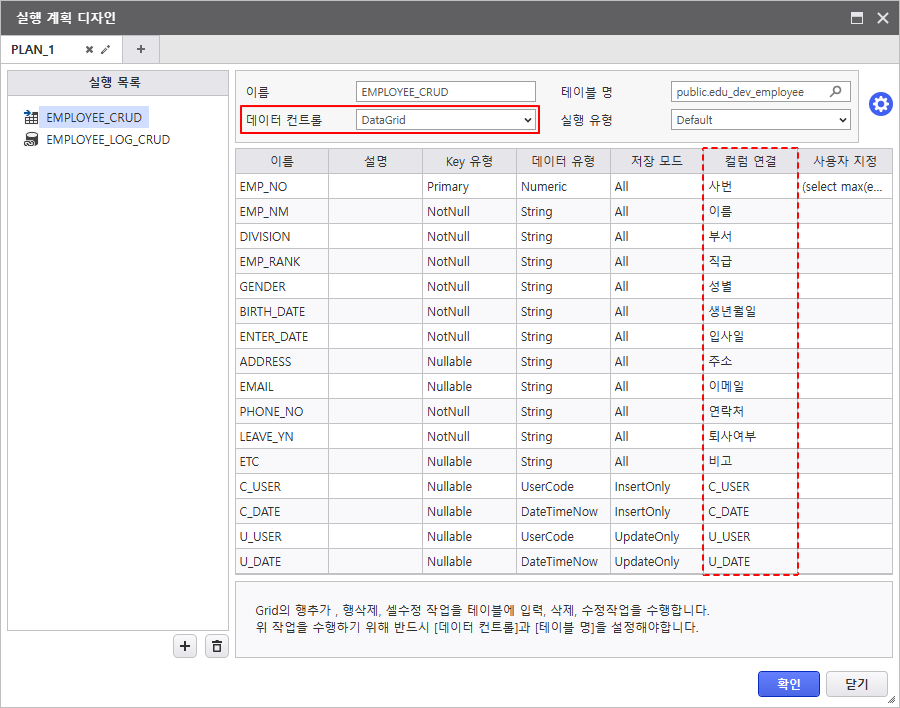
참고사항 icon false title Discription 템플릿 보고서이기 때문에 실행 계획 디자인이 일부분 작성되어 있습니다.데이터 컨트롤을 연결하여 컬럼 연결이 자동으로 되는 것을 확인합니다.
데이터 컨트롤Description Since this is a template, the core logic is pre-defined.Connect Data control to verify that the DataGrid is correctly mapped to the database columns.
- Data control : DataGrid

Step 5. Process Bot
설정하기Process Bot을 활용하여 데이터 CRUD와 화면 변경 동작을 설정합니다.
Configuration
Configure data CRUD and navigate actions using Process Bot.
Click the Process Bot(![]() ) 버튼을 눌러 Process Bot 설정 창을 실행합니다button to launch the configuration window.
) 버튼을 눌러 Process Bot 설정 창을 실행합니다button to launch the configuration window.

5.1
데이터 저장 모듈모듈을 활용하여 CRUD 동작을 설정합니다.
Data Persistence Module
Configure CRUD operations using functional modules.
- Click Process Bot 아이콘icon(
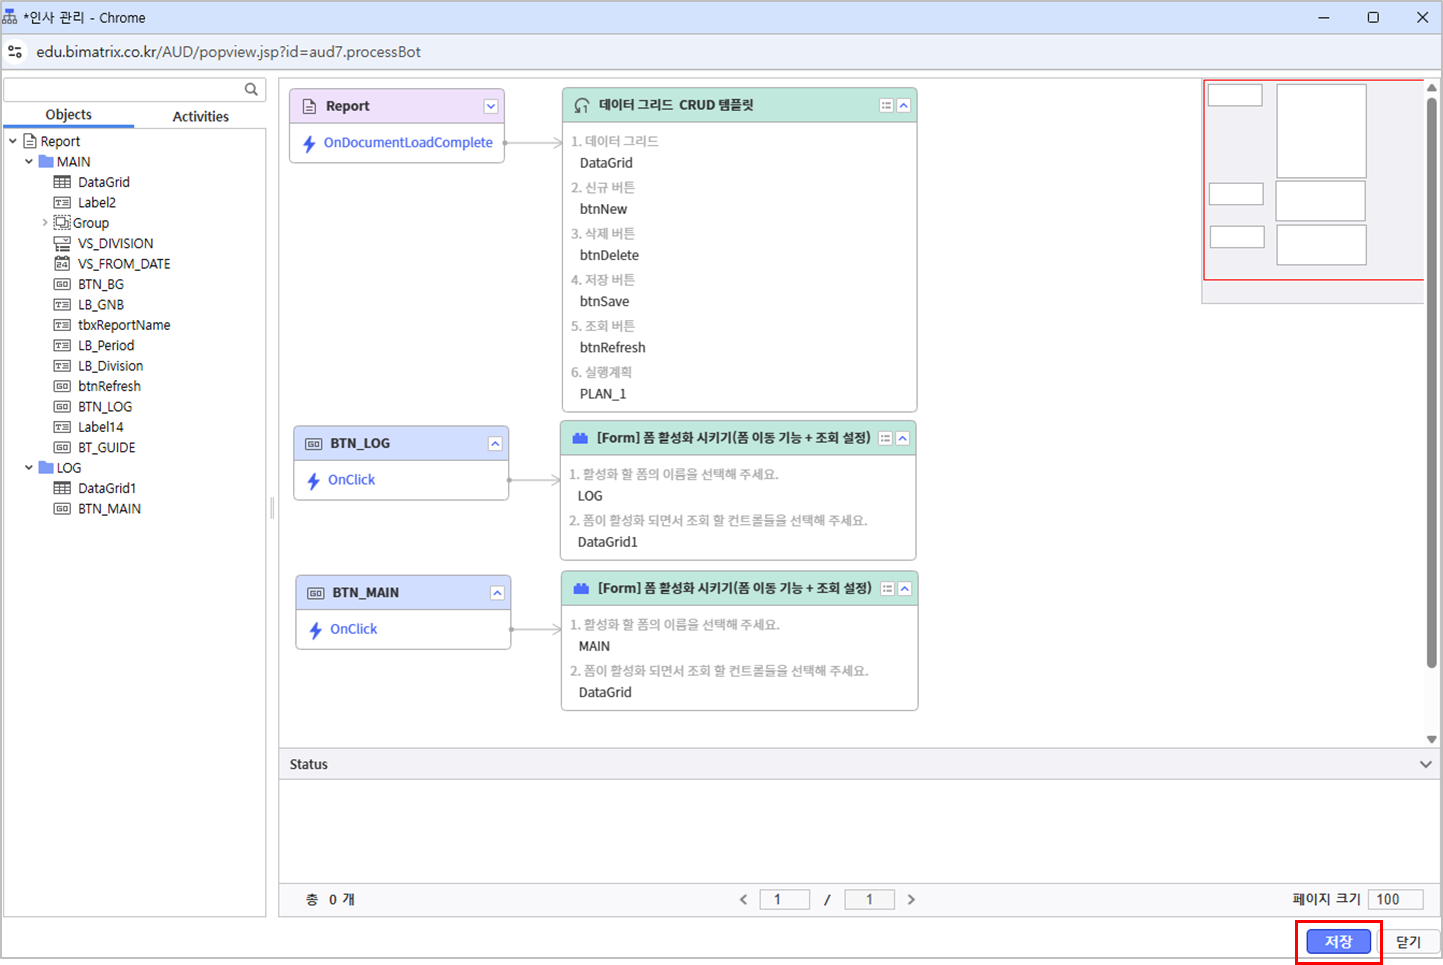
 ) 을 클릭하여 프로세스 봇 창을 실행하고, Report 를 더블 클릭합니다.
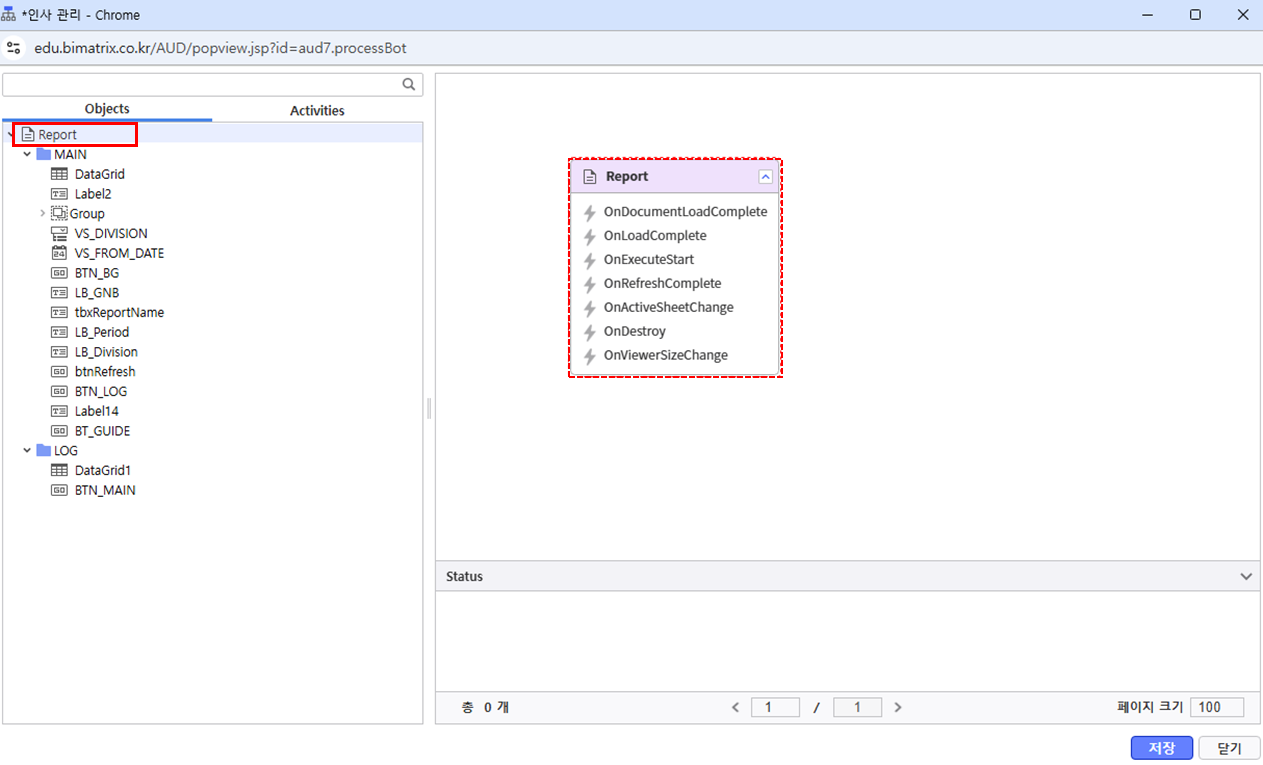
Activities 탭을 클릭하고, Modules > 기능별 > 데이터 저장 > '데이터 그리드 CRUD 기능(실행 계획)' 모듈을 더블 클릭합니다.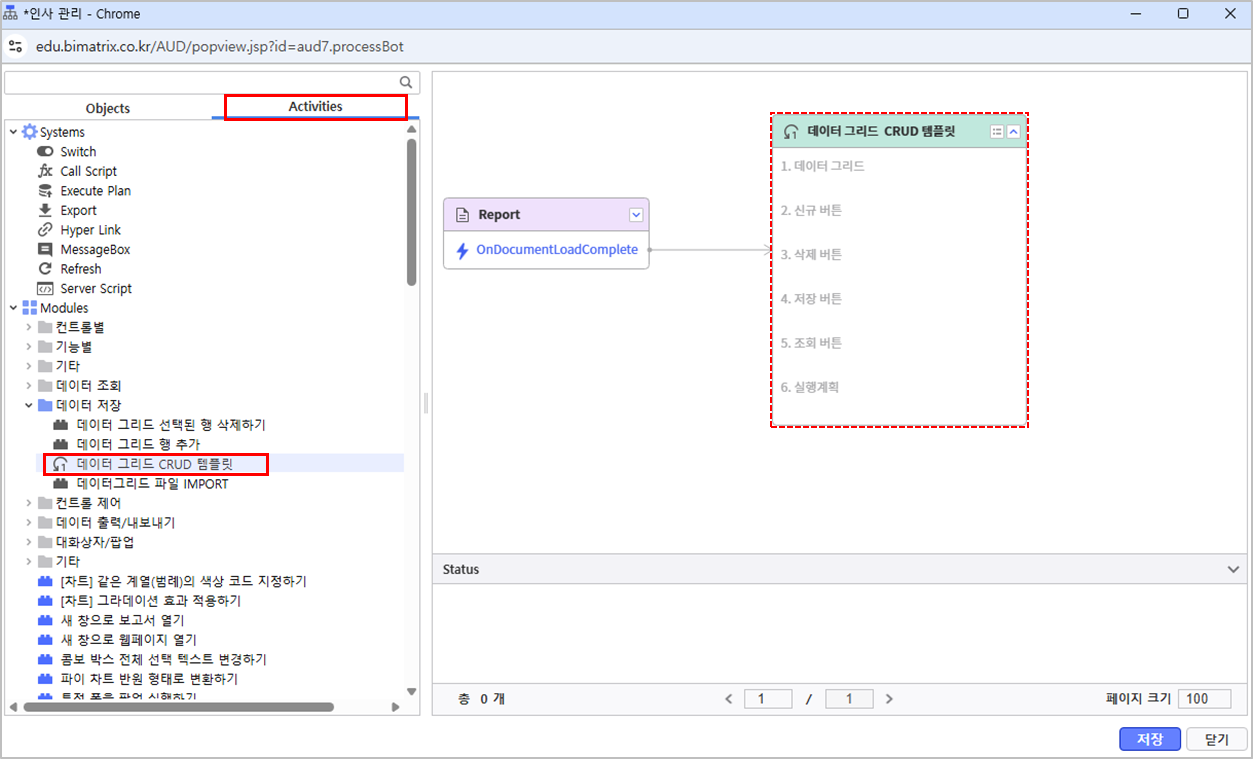
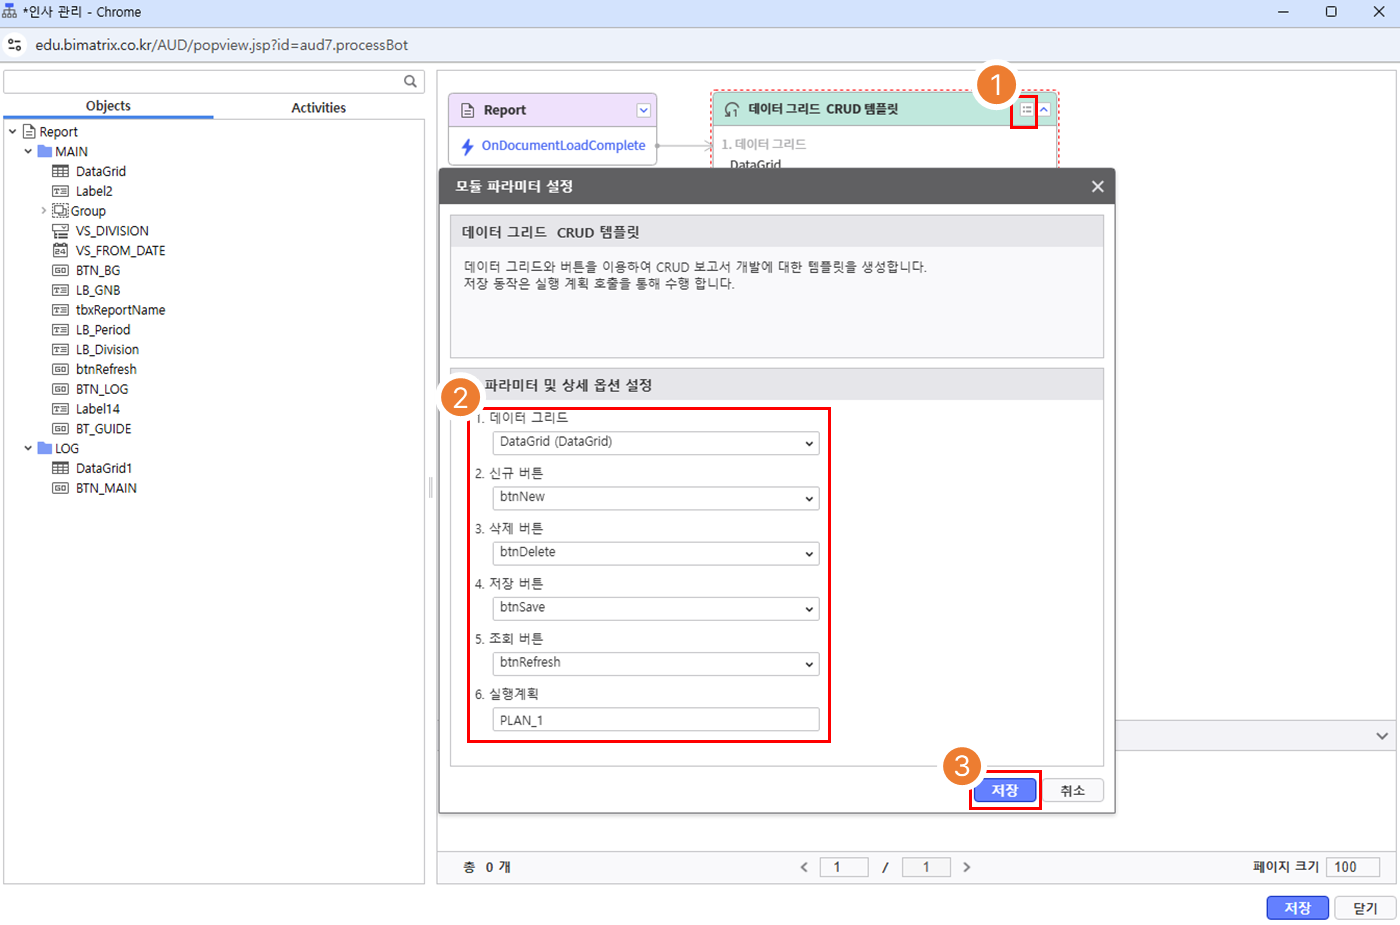
모듈 아이콘( )을 클릭 후, 세부 옵션을 설정합니다.
- 모듈 구성 내용에 맞게 옵션 선택
- [저장] 버튼 눌러 모듈 설정 완료
5.2 폼 이동 모듈
보고서 내의 버튼 클릭 시 다른 폼으로 이동하는 동작을 설정합니다.
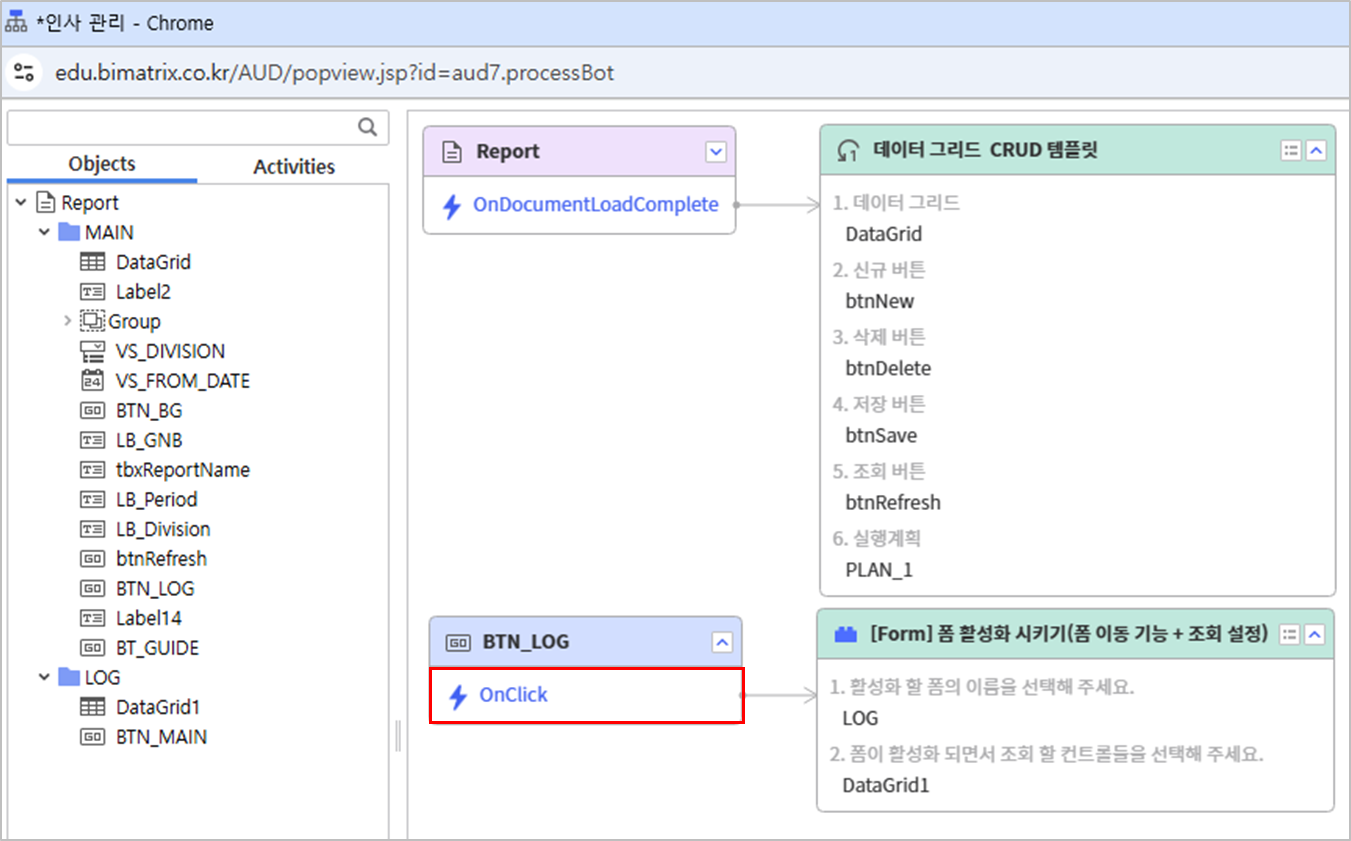
BTN_LOG 버튼 클릭 시 LOG 폼으로 이동하는 동작을 설정합니다.BTN_LOG 컨트롤을 더블 클릭합니다.
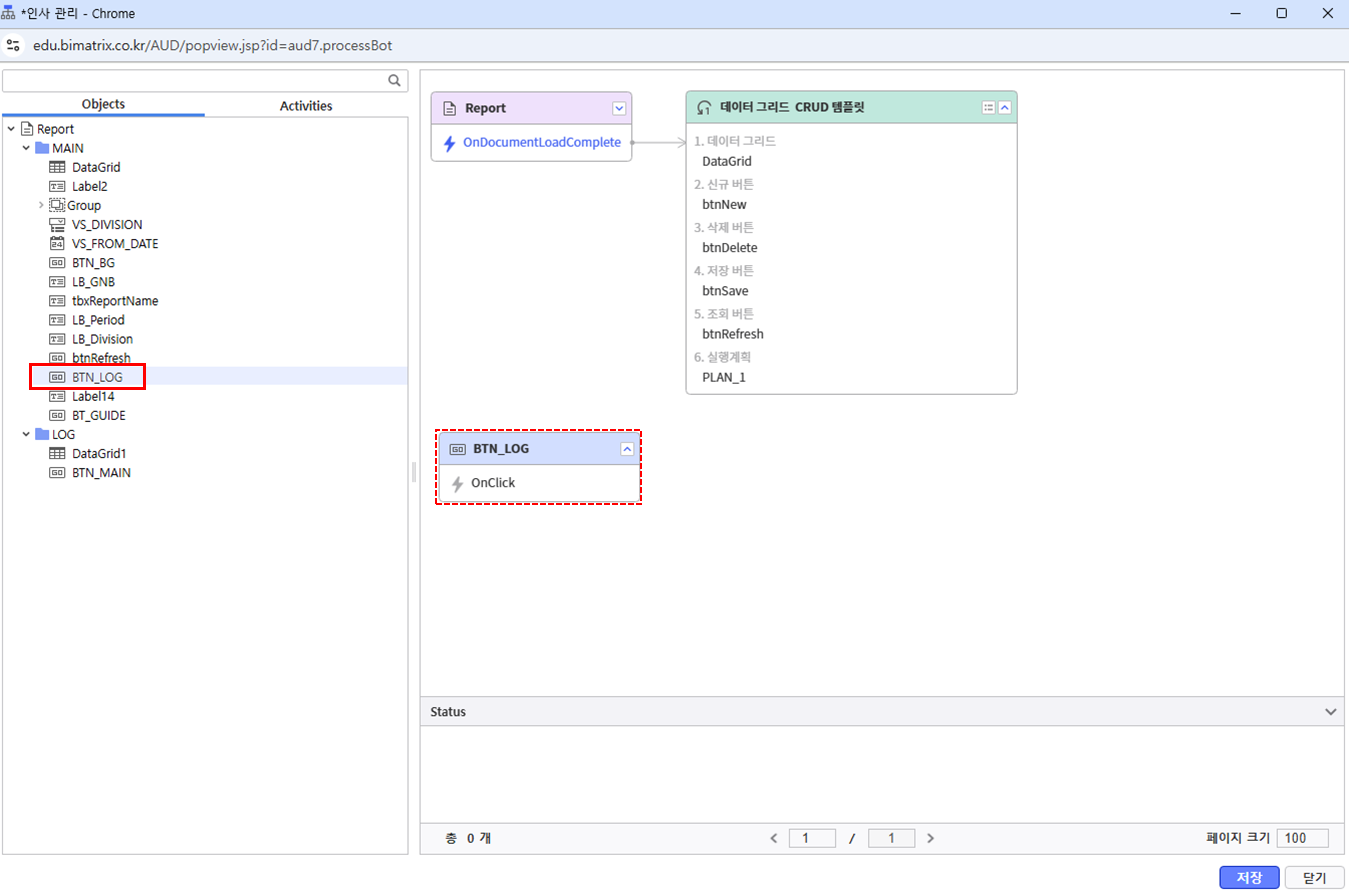
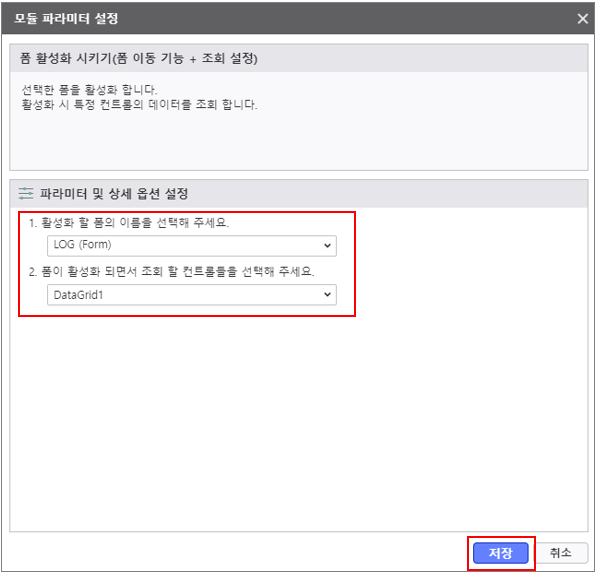
Activities 탭을 클릭하고, Modules > 컨트롤별 > Form > '폼 활성화 시키기(폼 이동 기능 + 조회 설정)' 모듈을 더블 클릭합니다.

모듈 아이콘(
- 모듈 구성 내용에 맞게 옵션 선택
- BTN_LOG 버튼 클릭 시 LOG 폼으로 이동 및 DataGrid1 컨트롤 조회 설정
- [저장] 버튼 눌러 모듈 설정 완료
BTN_LOG > OnClick 이벤트와 모듈을 연결합니다.
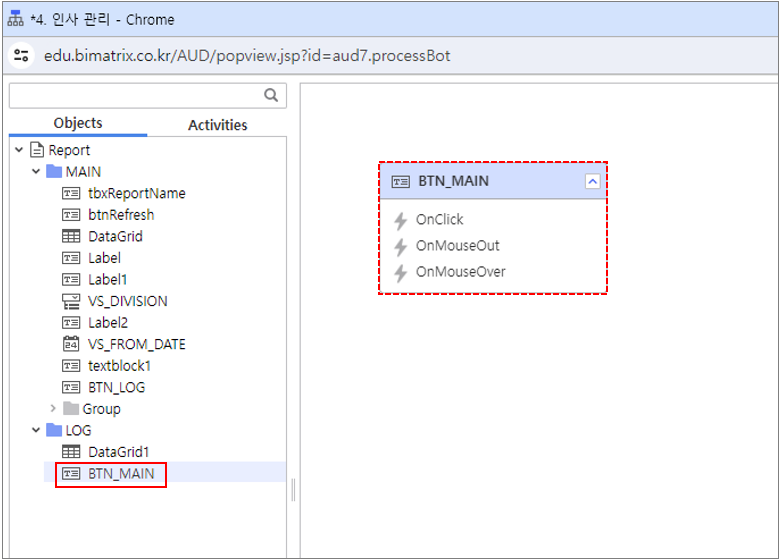
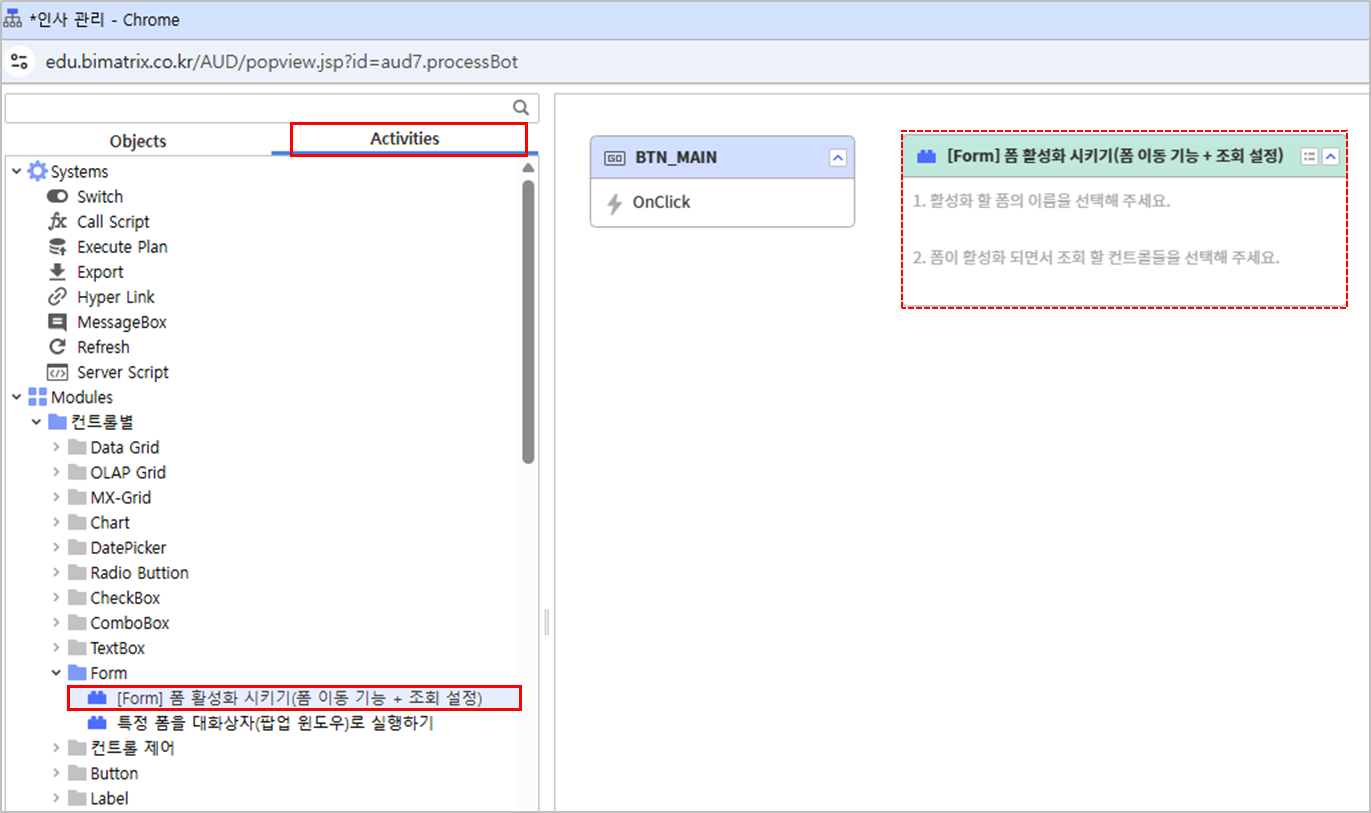
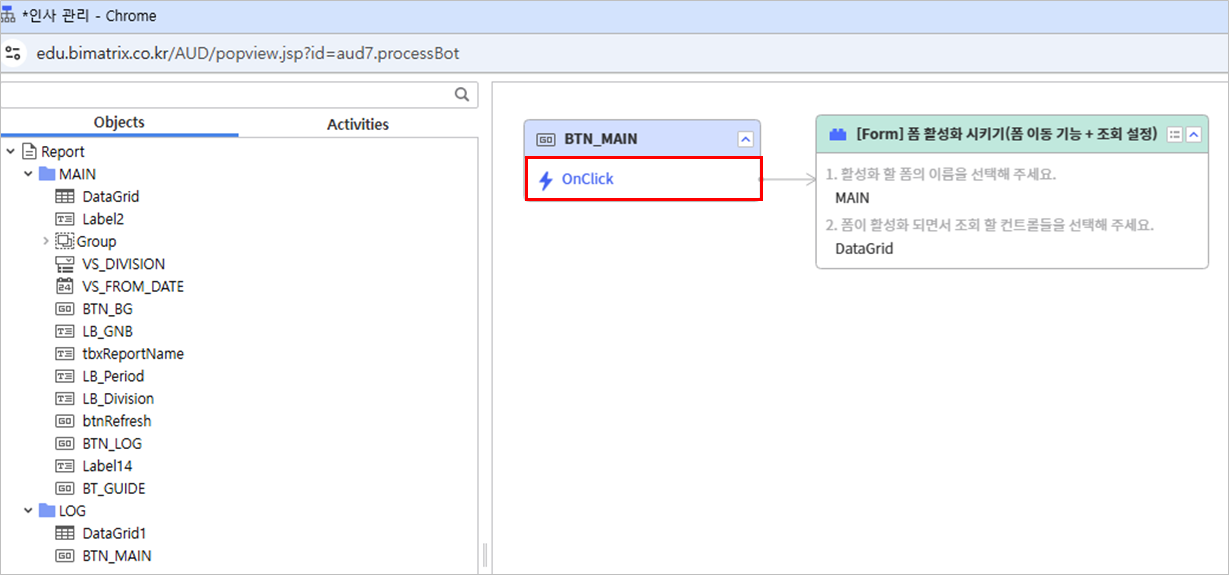
BTN_MAIN 버튼 클릭 시 MAIN 폼으로 이동하는 동작을 설정합니다.
BTN_MAIN 컨트롤을 더블 클릭합니다.
Activities 탭을 클릭하고, Modules > 컨트롤별 > Form > '폼 활성화 시키기(폼 이동 기능 + 조회 설정)' 모듈을 더블 클릭합니다.
모듈 아이콘(
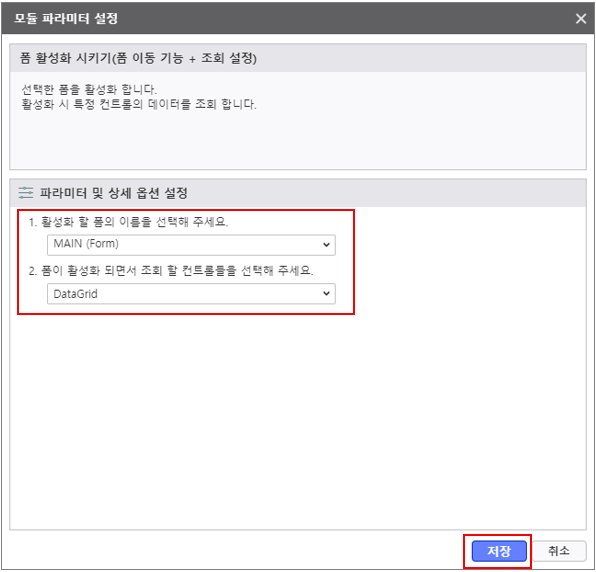
- 모듈 구성 내용에 맞게 옵션 선택
- BTN_MAIN 버튼 클릭 시 MAIN 폼으로 이동 및 DataGrid 컨트롤 조회 설정
- [저장] 버튼 눌러 모듈 설정 완료
BTN_MAIN > OnClick 이벤트와 모듈을 연결합니다.
보고서가 정상적으로 작동하는지 확인합니다.
| 변경 이력 |
|---|
- to launch the window and double-click the Report object.

- From the Activities tab, navigate to Modules > Save Data and double-click the 'DataGrid CRUD Template' module.

- Click the module icon() to configure detailed options:
- Select options according to the module configuration.
- Click [Save] button to complete the module setup.

5.2 Form Navigation Modules
Configure navigation to different forms upon button clicks within the report.
- Configure the action to navigate to the Log form when the BTN_LOG button is clicked.
- Double-click the BTN_LOG button.

- From the Activities tab, navigate to Modules and double-click the 'Activate Form(Move to other form + Refresh)' module.

- Click the module icon() to configure detailed options:
- Select options according to the module configuration.
- Configure navigation to the LOG form and inquiry for DataGrid1 upon clicking BTN_LOG button.
- Click [Save] button to complete the module setup.

- Link this module to the BTN_LOG > OnClick event.

- Configure the action to navigate to the MAIN form when the BTN_MAIN button is clicked.
- Double-click the BTN_MAIN.

- From the Activities tab, navigate to Modules and double-click the 'Activate Form(Move to other form + Refresh)' module.

- Click the module icon() to configure detailed options:
- Select options according to the module configuration.
- Configure navigation to the MAIN form and inquiry DataGrid upon clicking BTN_MAIN button.
- Click [Save] button to complete the module setup.

- Link this module to the BTN_MAIN > OnClick event.

- Verify that the Process Bot is configured as shown below and save.

Verify that the report is functioning correctly.
